In the previous post, we started to break down the interfaces of a couple of software synths in order to understand oscillators (the thing that makes the sound). Now we will look at the filter section.
How do you locate the filter section? It almost always has a label that reads “filter.” See below
If there isn’t a filter label, you’re looking for knobs or sliders that say “cutoff” and resonance” as below

A filter removes frequencies from a sound. In other words, it functions like an EQ. There can be a choice of filters, where you will see abbreviations like: “LP,” “HP,” “BP,” etc… You will also see words like “Hi” and “Low.” If there isn’t a drop down menu of some sort to change the filter, then the default filter will be a Low Pass filter.
A low pass filter removes high end from a sound. The cutoff knob will control where the high frequencies start getting removed. A visual representation of the sound would look like this EQ curve:

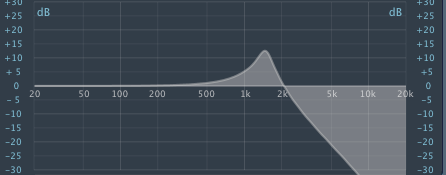
The resonance knob works interactively with the cutoff knob to create a “bump” in the EQ curve in order to make where the cutoff is happening sound more obvious. Adding resonance to our example above would look like this:
This type of filter is most common because it was a stock filter on Moog synthesizers, and also probably because most simple oscillator waves, like sawtooths, have very abrasive sounding high frequencies.
The next type of filter is a high pass filter, which removes low frequencies from the sound. I’ve found this filter is good for synth strings and high percussive types of sounds. An EQ curve example would look like this:

Again, adding resonance would create a bump in the EQ curve where the cutoff knob is set, like this:

Another popular choice for filter is the band pass filter, usually abbreviated BP. The band pass filter removes all the other frequencies EXCEPT for where the cutoff knob is set. The EQ curve would look like this:

A band reduction filter, or BR, leaves the other frequencies and removes the frequency where the cutoff know is set. In the engineering world, this is called a notch filter. The EQ curve would look similar to this:

Those are the main, and most common, types of filters. If you are a Massive user, you also have choices of Scream, Daft, Acid, and Comb. Scream, Daft, and Acid are all variations on the Low Pass filter, with some modifications like feedback loops. A comb filter delays the signal, then mixes it back in with the original signal to create phasing or flanging types of effects.
If you are an Absynth 5 user, you also have the choice of Supercomb and Cloud filters. The supercomb adds a feedback loop into the normal comb filter, which makes the filter effect more pronounced. A cloud filter breaks the sound into “grains” per second, then redistributes the sound in the stereo field, creating a type of surround sound, grandular effect. I definitely recommend playing around with the Cloud filter, as it creates some really interesting sounds, especially for pads.
One last thing to address is whether the is one filter, or more than one, and if they are in series or parallel.
If there’s only one filter, it’s easy to understand, the sound comes out of the oscillator and frequencies are removed by the filter. When there are two filters, the sound can be sent from the oscillator to one filter, then from one filter to the other. This setup is called series. The other choice would be to send the sound equally from the oscillator to both filters, then have the result come out of the two filters and mix together afterwards. This is called parallel.
To give an EQ illustration, in series, we will use the example of a low pass filter going into a high pass filter. So the sound comes out of the oscillator, then the low pass filter removes high frequencies, then the sound goes into the high pass filter, which removes the low frequencies. Depending on where you set the cutoff knobs, the result can look like this:

Using the same example in parallel, you would get two EQ curves that look like the standard low pass and high pass filters. So what you would have would be a sound with high frequencies removed, but it would retain its low end, and you would have a sound added to it that had it’s low end removed, but retained its high end.
So how are these different? In the series method, you would get a sound similar to a band pass filter. In the parallel method, you might not hear anything if the cutoff knobs where set just right to compensate for each other. I’ve found that the parallel setup is great for very subtly changing the sound.
Have fun experimenting. Feel free to write to me with any questions. Next time we will cover modulation.
