Another animated video done using Motion, Inkscape, GIMP, and Final Cut. We used Logic, Ableton, Battery, and an assortment of other stuff to make the music. Words and music by Stacy
Archive for Absynth
Second animated video
Posted in bass, electronic music, music, rock, sound design with tags Ableton, ableton live, Absynth, digital music, electronic, electronic music, ethan, final cut, finer, gimp, inkscape, Live, logic, Logic Pro, logic pro 9, Massive, music, music production, music video, Native Instruments, Operator, production, rock, sound design, stacy, synthesis on March 4, 2013 by finerethanFiner’s first animated music video
Posted in bass, electronic music, music, music production, rock, sound design with tags Absynth, animation, band, battery, final cut, gimp, inkscape, kontakt, Logic Pro, Massive, motion, music, music video, Native Instruments, sound design, synth programming, vocals on January 29, 2013 by finerethanSorry for my hiatus from educational writing. I’ve been drawing things into the computer… a lot. This is our first animated video, done with Motion and Final Cut. Hope you enjoy. If you listen to the song, you will hear lots of synth programming. I used the ES2 in Logic, Massive, Absynth, and Operator to make most of the sounds. The drums were programmed in Battery and Kontakt.
I will now have some time to finish my series on synth programming!
Production 101: making your own sound easily part 2
Posted in Uncategorized with tags ableton live, Absynth, Analog, digital, dj, electronic, electronic music, electronica, logic, logic pro 9, Massive, music, Native Instruments, Operator, production, sound design on December 24, 2012 by finerethanIn the previous post, we started to break down the interfaces of a couple of software synths in order to understand oscillators (the thing that makes the sound). Now we will look at the filter section.
How do you locate the filter section? It almost always has a label that reads “filter.” See below
If there isn’t a filter label, you’re looking for knobs or sliders that say “cutoff” and resonance” as below
A filter removes frequencies from a sound. In other words, it functions like an EQ. There can be a choice of filters, where you will see abbreviations like: “LP,” “HP,” “BP,” etc… You will also see words like “Hi” and “Low.” If there isn’t a drop down menu of some sort to change the filter, then the default filter will be a Low Pass filter.
A low pass filter removes high end from a sound. The cutoff knob will control where the high frequencies start getting removed. A visual representation of the sound would look like this EQ curve:
The resonance knob works interactively with the cutoff knob to create a “bump” in the EQ curve in order to make where the cutoff is happening sound more obvious. Adding resonance to our example above would look like this:
This type of filter is most common because it was a stock filter on Moog synthesizers, and also probably because most simple oscillator waves, like sawtooths, have very abrasive sounding high frequencies.
The next type of filter is a high pass filter, which removes low frequencies from the sound. I’ve found this filter is good for synth strings and high percussive types of sounds. An EQ curve example would look like this:
Again, adding resonance would create a bump in the EQ curve where the cutoff knob is set, like this:
Another popular choice for filter is the band pass filter, usually abbreviated BP. The band pass filter removes all the other frequencies EXCEPT for where the cutoff knob is set. The EQ curve would look like this:
A band reduction filter, or BR, leaves the other frequencies and removes the frequency where the cutoff know is set. In the engineering world, this is called a notch filter. The EQ curve would look similar to this:
Those are the main, and most common, types of filters. If you are a Massive user, you also have choices of Scream, Daft, Acid, and Comb. Scream, Daft, and Acid are all variations on the Low Pass filter, with some modifications like feedback loops. A comb filter delays the signal, then mixes it back in with the original signal to create phasing or flanging types of effects.
If you are an Absynth 5 user, you also have the choice of Supercomb and Cloud filters. The supercomb adds a feedback loop into the normal comb filter, which makes the filter effect more pronounced. A cloud filter breaks the sound into “grains” per second, then redistributes the sound in the stereo field, creating a type of surround sound, grandular effect. I definitely recommend playing around with the Cloud filter, as it creates some really interesting sounds, especially for pads.
One last thing to address is whether the is one filter, or more than one, and if they are in series or parallel.
If there’s only one filter, it’s easy to understand, the sound comes out of the oscillator and frequencies are removed by the filter. When there are two filters, the sound can be sent from the oscillator to one filter, then from one filter to the other. This setup is called series. The other choice would be to send the sound equally from the oscillator to both filters, then have the result come out of the two filters and mix together afterwards. This is called parallel.
To give an EQ illustration, in series, we will use the example of a low pass filter going into a high pass filter. So the sound comes out of the oscillator, then the low pass filter removes high frequencies, then the sound goes into the high pass filter, which removes the low frequencies. Depending on where you set the cutoff knobs, the result can look like this:
Using the same example in parallel, you would get two EQ curves that look like the standard low pass and high pass filters. So what you would have would be a sound with high frequencies removed, but it would retain its low end, and you would have a sound added to it that had it’s low end removed, but retained its high end.
So how are these different? In the series method, you would get a sound similar to a band pass filter. In the parallel method, you might not hear anything if the cutoff knobs where set just right to compensate for each other. I’ve found that the parallel setup is great for very subtly changing the sound.
Have fun experimenting. Feel free to write to me with any questions. Next time we will cover modulation.
Production 101: Making your own sounds easily
Posted in electronic music, lessons, music, music production, sound design with tags AAX, Ableton, Absynth, Analog, AU, digital music, electronic music, ES2, ESM, how to program sounds, Live, Logic Pro, Massive, music, music production, Native Instruments, Operator, production, programming, recording, Sculpture, sound design, synthesis, VST on December 23, 2012 by finerethanAs I get more and more into the electronic music and DJ world, I find that sites like djtechtools.com write a lot about being a producer and making your own music. There are a huge amount of excellent software synthesizers out there, ranging from the free plugins in Logic and Ableton to paid ones like Massive and Absynth from Native Instruments. I’ve never been a big fan of presets, mostly because of not wanting to have sounds like anyone else; so I spent an obscene amount of hours learning the ins and outs of each soft synth that I had. What I found was, every synth basically follows the same principles in the way that they are designed and knowing how one works can lead you to figure out another one. So, I decided to simplify the learning process and teach you how to understand any soft synth and build your own sounds.
Almost all soft synths have a uniform way of generating sound, known as subtractive synthesis. An oscillator makes a sound (or noise), a filter removes frequencies from that sound, then the result is modulated (changed over time) in some way.
For today, I will be focusing on recognizing the oscillator section of a soft synth. I have expanded the definition of oscillator to include anything that makes the sound. A synth using samples or physical modeling is not technically “oscillating,” but it still generates a sound and then filters and modulates, so it’s just easier to look at them all the same.
The first way to locate an oscillator is to look for wave shapes. In the example below, I’ve put an orange box around the three oscillators of this Logic synth.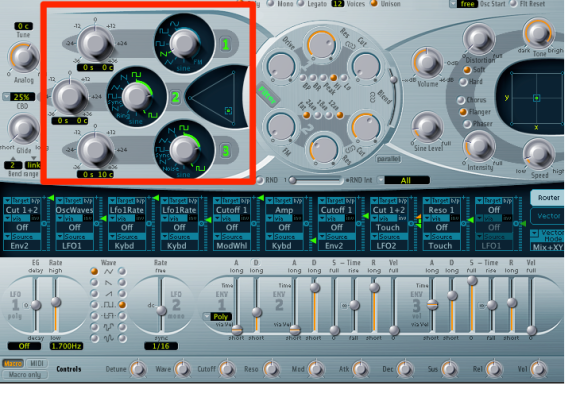 Notice the wave shapes that you can choose from by turning the dials. Sine waves, square waves, triangles, pulses, and sawtooth are very common. I would recommend trying them out to learn what they sound like. I can also make a video demonstrating the different sounds if anyone asks. While the layout can be quite different, the idea of having a thing generate the basic sound will always be there. Here is what Absynth 5 looks like if you go to the Patch tab.
 Instead of turning a dial, you choose waves from a drop down menu in Absynth, but the idea is still basically the same.
Ableton went one step easier and actually included the word oscillator in Operator:
Armed with that information, see if you can locate the oscillator section of this synth:
And now try Massive:
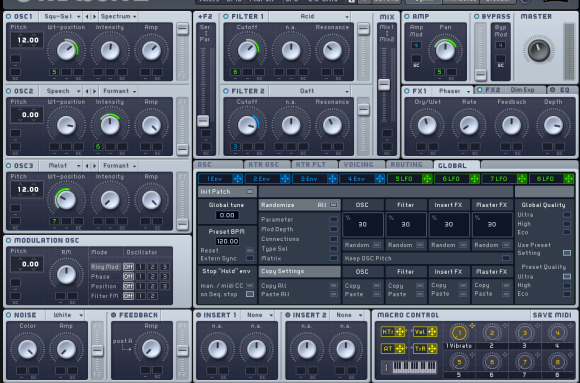 My last example is a physical modeling synth from Logic, if you have trouble, try comparing this one to the Logic example above.
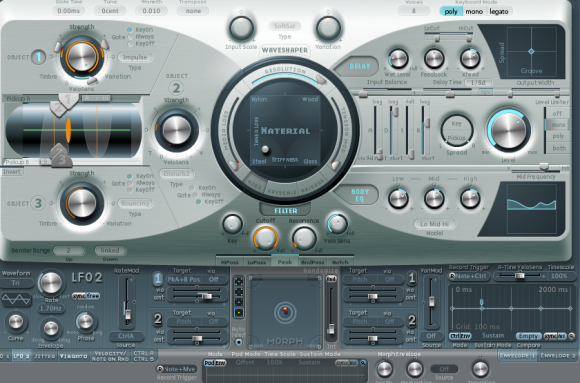 So the homework is to try out some different sounds and learn what the character of each wave is. Next time we will look at the different types of filters and how they modify the sound from the oscillators. If you would like me to cover a specific soft synth or subject, feel free to leave a comment or send me a message.
